
Also change
rowA and rowB to draw row A and draw row B (change images, text, starter file, solutions, and TG).
--MF, 1/18/19


rowA and rowB to draw row A and draw row B (change images, text, starter file, solutions, and TG).
--MF, 1/18/19
PG: The change, for me, is about clarifying and focusing on purpose. Why do I want to use abstraction to draw a brick wall? Why do I want to draw a brick wall? "In this lesson, you will…." Note that if we change U1 as suggested, students will already know how to use flat line ends to draw a brick, so we remind, not teach, there.
BH: What a great page! :-)
MF: need to address comments

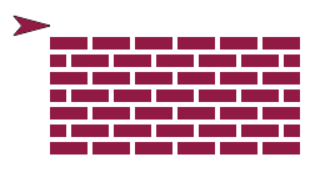
In this project, you will use abstraction to draw a brick wall.

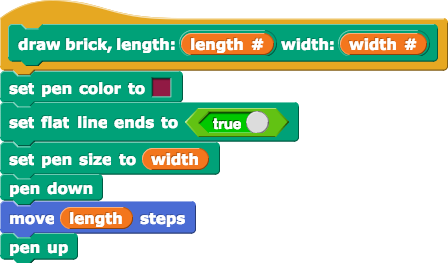
A picture of a brick is just a rectangle with a brick red color. However, there's no draw rectangle block in snap. One way to draw one is by thinking of a rectangle as a very thick line. Here's the idea:

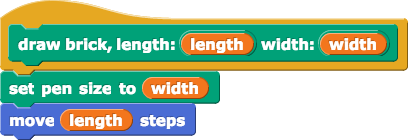
draw brick block shown below. Read the code; then try it out.
Ordinarily, Snap! draws rounded ends on thick lines:  . That's often the best choice, and you can see why below. But for bricks, we want flat line ends:
  , and so we'll use
  to turn on flat line ends.

![set [video capture] to 'predicate input slot' with menu open showing: turbo mode, flat line ends, video capture, mirror video set [video capture] to 'predicate input slot' with menu open showing: turbo mode, flat line ends, video capture, mirror video](/bjc-r/img/blocks/set-video-with-menu.png)
As you learned in Unit 1 Lab 2 Page 2: Making Programs Talk, procedural abstraction is the process of developing a program by breaking up a large problem into smaller sub-problems.
Creating a draw brick block lets you think in terms of a procedure with a name related to the problem you are solving. This makes your code easier to read, and once you've coded and debugged the block, you don't need to think about how it works each time you use it. That's the beauty of procedural abstraction.
You'd like the "top level" block to be something like this:

Getting there involves problem decomposition: breaking the problem into smaller pieces.
There are two kinds of rows, so we make blocks that specialize in each:


draw brick to make blocks  and
and  .
.It's possible to go overboard on abstraction and build so many blocks that your program is just as cluttered as it would be without the custom blocks. But it can be useful to make a custom block even when its definition is just one built-in block. For example, to draw the cement between blocks (shown as white space), you can just use  , but it might make sense to define a
 draw cement block that uses move inside it.
Why? You might later decide that four steps is the wrong thickness for cement and you'd rather have five. Or you might want the cement to be cement-colored, slightly gray. With many  scattered through your program, you would have to find and change each one. To make matters worse, your complete project might have
 move blocks that aren't about cement. But with a draw cement block, you can change just its definition, and all the cement in your picture will be changed.
Debug by thinking about what you are trying to accomplish, not about your code. For example...
 block.
even? predicate from your U2L4-MathLibrary. You leaned about exporting and importing blocks on Unit 2 Lab 3 Page 1: What's a Predicate?
For the Create Task, you will need to be able to identify a procedural abstraction in a program you write and also clearly explain how your abstraction reduces the complexity of your code.
draw Brick Wall (and as needed to row A and row B) for: